Wednesday, 16 July 2014

SEQUENCING FOR SUCCESS: TIPS FOR YOGA TEACHERS


In the teacher training the students are at the point where they are designing and teaching 1 hour yoga classes to each other, which is always a lot of fun, and as I taught  both a mixed level and an advanced workshop this week I have had sequencing on my mind. Creative sequencing has always been one of my favorite aspects of teaching yoga and I believe it is one of the most valuable tools we have to help our students learn asana (and so much more) in a fun, safe, and empowering way.  I believe that a mindfully sequenced yoga class can help to establish a clear teaching environment in the classroom as the teaching objectives can be chosen ahead of time,  and though the class you plan may need to be adapted somewhat based on who actually shows up, the very fact that you have walked in with a plan and an intention means that you are much more likely to offer something of real value, rather than simply leading your students through yet  another repetition of what they are already familiar with.  Now while I certainly don’t plan every single class I teach I do plan most of them, and especially when I have a specific pose or lesson I want my students to learn.
It has  been my experience that when I take the time to plan out and sequence my classes in a mindful way then I am more able to -
  • Support my students in gaining greater leverage into intermediate or advanced postures
  • Teach principles of alignment and action that will empower their practice
  • Give them tools to avoid common misalignments
  • Establish a mood for practice such as Clarity, Celebration, or Mindfulness
  • Help them embody inspiring philosophical teachings or practical wisdom
So how can you use sequencing as a skilful tool to deepen your students learning experience in the classroom? Here are some things that I have found helpful and that I train my yoga teacher trainees to think about.

Things To Think About When Planning Your Classes

When sitting down to plan your classes ask yourself the following questions to help in planning a class that is suitable to your student base and has a clear focus.
  • Who am I planning this class for?
  • What is the general level of the students attending this class?
  • What is my primary intention with this class?
  • What am I trying to teach?
  • What do I want the students to walk away with?
  • How long is the class?
  • What style is the class?
  • What time of day/year is it?

 3 Primary Doorways for Choosing Class Sequences

There are many doorways into class planning but I have found that one of three primary entry points are most useful in planning my classes and they are.
  1. Moving towards a peak pose
  2. Based around an alignment principle
  3. Inspired by a philosophical or heart based theme
While some of your classes may have all three of these primary elements in them picking one as a framework to 
get started
 with is helpful. Below are some tips for each category.

Tips on Sequencing to a Peak Pose

Sequencing to a peak pose means to choose a destination for the class, and to then build your class around how to get there safely and effectively, and how to get back.  Students love the thrill of working towards a goal and they value learning something specific as well as being challenged to try something new. Below are some tips on sequencing to a peak pose.
  •  Pick a pose that is appropriate to the general level of the class
  • The pose should be challenging, but not absolutely impossible, make sure that everyone has a stage of the final pose that they can work on so nobody is left out
  • Take the time to really think about what will be needed to access the pose and then design a class that will enable your students to cultivate whatever that is, this way you are teaching them key actions and alignment principles rather than simply shapes of poses
  • Build towards the pose in a logical and progressive way and always try to get there in the shortest time possible, while still ensuring that you have opened the key muscles groups needed, or taught the key actions that will allow them to do the peak pose
  • Cut out all filler postures that don’t directly enable the opening required for the peak pose, be specific and efficient in your posture choices
  • Make sure to leave enough time to do the appropriate counter poses in order to bring them back from the peak towards Savasana with a relaxed body and mind

 Tips on Sequencing Around An Alignment Principle

Designing a class to highlight a key alignment principle, or to address a common misalignment, is a great teaching technique and really allows your students to get the lesson firmly in their bodies, and minds, through repetition and practice.
  • Identify an alignment principle that will help your students to access greater ease, connection, or power in their practice
  • Choose simple and familiar poses that will help them to learn the alignment principle clearly and explain it to them so they know what it is, and what it’s benefits are. Ex: in Tadasana instruct the proper placement of the feet and let them know that setting a good foundation will take care of 90% of the misalignment problems in the body of the pose and creates a grounded, mindful state of mind
  • Weave in a few poses that are more challenging to maintain the alignment principle in, but which are greatly benefited by the principle itself Ex: doing Urdhva Danurasana without letting the foundation of the feet turn out or lift so as to avoid back pain, feel greater connection in the pose, and access more of a clear opening in the front body
  • Make sure to repeat the action enough times, and in enough different types of postures in the class that the students understand it clearly- even if they can’t yet maintain it all of the time. This gives them something to work towards and they will remember the lesson in their bodies.

Tips on Sequencing Around a Theme

Sequencing to a philosophical or heart based theme can add a lot of power to your classes and though I could write an entire blog post about how to skillfully weave a theme into your class the primary things to think about once you have chosen a theme for class are-
  •  Once you have chosen an inspirational theme for your class try to distill your theme into one or twokey words that represent the main lesson you want to impart and that you want your students to be able to embody or cultivate
  • Now choose poses that will help your students to embody the theme, or the mood that you want to cultivate in class, and think about how you are going to sequence and instruct the poses so that your choices support your choice of theme
  • Think about what breath exercises (pranayama), meditations, partner exercises, demonstrations,readings, or visualizations you might also want to include that will help support your theme
  • And finally write down 3-4 instructions you might use in class that allow you to touch on your theme and even though you may not end up using the exact instructions you wrote down when you are actually teaching the class I’ve found it helpful to have thought about how I will deliver the theme ahead of time (and if you can’t think of 3-4 instructions with your theme choice than you should probably try a simpler theme!)

Yoga Lesson Plan 2: Twisting From The Core And Intention

Yoga Lesson Plan Two
Physical theme: Twisting from the Core
Practice Principle: Intention
The anatomy of the spine allows for the greatest rotation in the cervical spine. You can easily feel this by turning the head from side to side. For this reason, we often begin a twisting pose by turning our heads. However, to fully express the intention of a twisting pose, we need to rotate from lower in the spine. When we initiate a twisting pose from the head and neck, the rest of the body does not necessarily follow. The result is a strained and incomplete action, and we may try to use our arms to force ourselves deeper into the pose. An alternative approach is to twist from the core, using abdominal and back muscles to turn the entire rib cage. The head and neck follow, aligning the center, heart and gaze.
The physical focus of this yoga lesson plan is twisting from the core, and the broader focus of intention mirrors this physical action. To follow through with our intentions, we draw on our inner strength to support our heart’s purpose and direct our actions.
Opening (10 min)
Introduce the theme of the class with an opening sequence that explores the four actions of the spine: extension (backbending), flexion (forward-bending), lateral flexion (sidebending), and rotation (twisting). One possible sequence is to explore extension and flexion on all fours with spine waves (cat/cow), then bring students to kneeling or cross-legged position for a simple sidebend and twist. Each movement should be linked to the breath (inhaling during extension and exhaling during flexion or rotation).
Give students the opportunity to feel two different approaches to twisting. First, have them turn their heads as far as they can, and then try to “catch up” with the rest of the body by using their arms to pull or push themselves into the seated twist. Then have them initiate the same twisting pose from the core, with an exhalation, turning the torso before the head, and using the arms only to support themselves in the final position. Most students will agree that this last approach feels far better. Encourage students to use this approach in all twisting poses.
Dynamic Warm-ups (10 min)
To help students connect more fully to the core actions you will be using in standing poses, guide them through a traditional twisting abdominal exercise (such as the “criss-cross” oblique curl). If sun salutations are a part of your typical class, invite students to notice whether each movement is initiated from the head and neck or from the core.
Standing Yoga Poses (20 min)
You can add a twist to almost any standing pose. Below are some suggestions for adding twists to basic poses. Experiment with adding standing yoga twists to other poses. For each pose pair, practice moving from the basic pose into the standing twist, and back into the basic pose, several times. Then hold the twisting pose for five to 10 breaths.
  • Chair pose (utkatasana) and twisting chair pose (parivritta utkatasana). Have students begin in chair pose, bring their palms together at the heart, twist to one side, and then place one elbow on the outside of the opposite knee.
  • Warrior I (virabhadrasana I) and twisting lunge (parivritta parsvakonasana). From warrior pose, with arms overhead, repeat the transition practiced in chair pose: lower the hands to heart, and twist from the core before placing the elbow on the outside of the front knee.
  • Standing head to knee pose (parsvottanasana) and twisting triangle pose (parivritta trikonasana). When moving into the twist from standing head to knee pose, remind students to initiate their movement from the core and not the head and arms.
If you use the Sanskrit names of poses in your teaching, you can introduce the term “parivritta” as “a turning of the heart.” As you guide students through each transition, you can remind them that each pose is a turning of the heart, supported by the core.
One hands-on adjustment works well in most standing twisting poses: place one hand on the student’s back ribs and the other hand on the opposite front shoulder. With very little pressure — more of a suggestion than a forceful adjustment — use your hands to guide the student into a more fully expressed spinal twist from the core.
Seated Yoga Poses and Deep Release (15 min)
Choose seated and floor poses that follow the opening sequence of the four movements of the spine. One possible sequence is bridge pose (setu bandhasana) or any other backbends for spinal extension, seated gate pose (parighasana) for lateral flexion, a seated forward bend (such as janu sirsasana) for spinal flexion, and a reclining spinal twist.
Relaxation and Closing (5 min)
In relaxation pose or a seated meditation, bring students back to the theme of the class: a “turning of the heart.” Ask them to reflect, “What, in life, would you like to turn your heart to?” Invite them to mentally commit to this intention, and remind students that they have the inner strength to follow through with action.

1-hour beginner’s class plan

For my first regular yoga class (7:30PM Friday nights at Kali Yoga, pay-what-you-can), I’m going to start with the following routine. Briefly, it will include a ~5 minute intro and shares, ~5 minutes of simple stretches, ~40 minutes of asana, ~10 minutes of pranayama, and ~5 minutes of meditation.
  • General Intro
    • I will introduce myself, and ask everyone to introduce themselves and share something (will vary with each class)
      • The philosophy is that student participation makes things more yogic.
    • Start with stretches (not asana) from neck to toes.
      • “Let the breath be free, let the mind wander.”
  • Intro to Asana
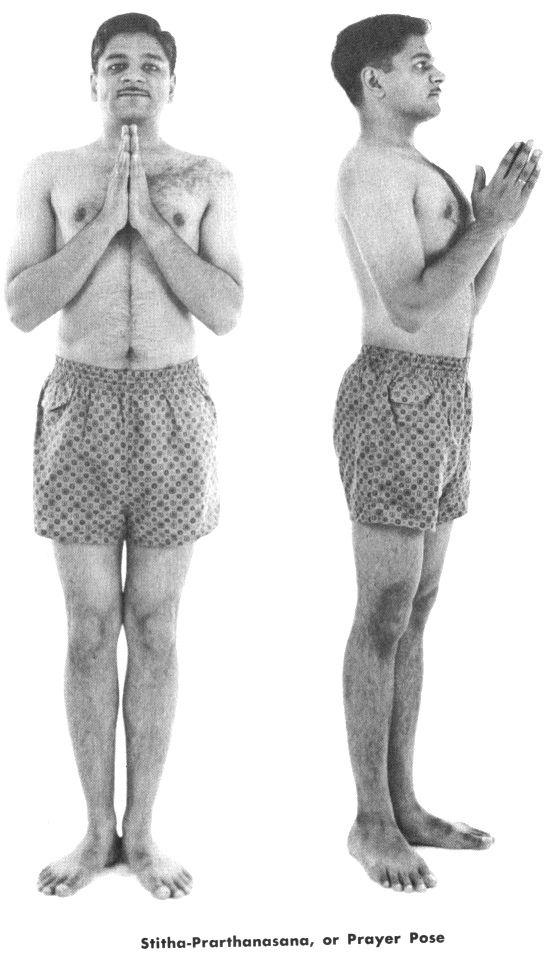
    • Stith prathnasana (mountain pose with hands in prayer).
      • Define yoga as unity of body and mind, with the nervous system being the connector. Yoga asanas are specific body configurations designed to link the body and mind by activating the nervous system.
      • Introduce the concept of Bhava (attitude), i.e., with the feet together and hands clasped, our bodies have to stand still, so our nervous system links this message to the brain, and our mind becomes more still. In this pose, we practice the bhava of stillness and acceptance. Accept that you’re here to practice yoga (or whatever your intention is).
    • Forward fold, with the bhava of humility and acceptance. Accept the stretch in the back body.
    • Lower to child’s pose, with the bhava of security, grounding. Introduce deep yogic breathing.
  • Basic Hatha sequence (that I learned in my very first yoga class)
    • Table + cat/cow
    • Core warmup, extending each leg back and arm forward and curling inward.
    • Downward dog -> plank, with emphasis on alignment and breath.
      • Repeat ~3 times before slowly walking up to forward fold and mountain.
    • ONE sun salutation very slowly, explaining how it is intended to expose the body to the morning sun, and stretch + exercise every muscle, and practicebhavas of stillness (mountain), confidence (back bends), humility (forward folds), balance (lunge), and integrity (plank/downward dog).
    • THREE more suryas by themselves.
    • Tree pose, with bhava of balance.
  • Seated asanas
    • Parbat asana, and all variations (lean left, right, back, front, twist).
    • Gomukhasna + forward fold
      • Add twist OR eagle arms
    • One / both legged forward fold, with emphasis on yang version (reaching, breathing deep) vs. yin version (relaxing hands, letting the back body melt forward).
    • Reverse table / bridge / wheel, depending on class energy.
    • SHORT savasana (corpse pose)
      • explain metaphor for death
  • PRANAYAMA
    • Ideally in vajrasana, or any comfortable seat, on a block, or against a wall
    • Breath awareness, without judgment
    • Basic pranayama: inhale, hold, exhale, hold
      • build this gradually, introducing each portion separately, and increasing the time slowly
      • explain how breath is a metaphor for lifespan
    • Nadi shodhana / alternate nostril
      • optional: “virtual” version using visualization instead of actual hands on nose
    • Kapalbhati (if time permits)
    • Chant OM / OM SHANTI / etc. (if time permits)
  • MEDITATION
    • any one of 5-points of awareness, tratak (open-eye concentration), metta (loving-kindness), vipassana (breath-awareness), zazen (watching the watcher)
That should easily take a little over an hour! I’d also like to introduce themes for each class, such as one of the 8 limbs, or a specific chakra or element to focus on, depending on the day and the energy level. Stay tuned for more routines that I’ll keep posting in my efforts to make yoga more open-source and accessible!

How to Set Up a 1 Hour Yoga Class


For the proper set up of a one houryoga class, you should have prior yoga teacher training and certification
. YogaAlliance sets standards for yoga schools in the United States, and it listsaccredited schools on its website. Remember that yoga classes vary greatly in styles and designs. As long as you warm-up and cool-down your students properly, much of your class content is open to creativity in sequencing and form.

tep 1

Choose your music -- music provides a soothing background to a class and a structure that makes it simple to plan poses within the allotted class time. The easiest way to plan an hour class is to have 60 minutes of yoga music prior to figuring out your yoga sequence. Practice teaching your class to your music once you have your class designed.

Step 2

Designate one to three minutes for your introduction. The introduction should always include your name,class name and length. You can also include general tips on how to enjoy the class, yogic principles to keep in mind or a simple, inspirational passage or quote. Design your introduction according to the level and style you will teach. For example, it would be more vital to tell a beginner class that you breathe in and out through the nose during class, than it would be to tell experienced yogis in an advanced class.

Step 3

Use five to 10 minutes for yogic breathing time. You can teach a particular Pranayama exercise or stick with basic complete breath techniques. Depending on your style, you might add a chant or mantra to the beginning of this segment, as practiced in Sivananda yoga, for example.

Step 4

Teach a Sun Salutation A and B sequence for five to 10 minutes or longer, depending on the intensity of the class you want to present. For more gentle formats, spend five of your warm-up minutes breaking down the pieces of the Sun Salutations, having students hold a Kneeling Plank and Cobra for more than one breath, for example, so they learn the mechanics of each pose before flowing through them. Sun Salutations vary from style to style, but most of them include eight poses, according to "Yoga Journal." You can also warm-up with aCat and Cow pose combination or a supine Spinal Twist flow.

Step 5

Use 20 to 25 minutes of your hour for standing and balance poses. If you use a vinyasa style, then you can move quickly through yoga sequences by switching between poses on an inhale or exhale. For example, a simple sequence is to move students through Warrior I, II, Reverse, Warrior III and Side Angle, switching to the next pose after a complete breath. Leave time to repeat your sequence on each side of the body. Your class can also include holding poses for five to ten breaths during this segment.

Step 6

Use 10 to 15 minutes for deeper stretches and floor poses. Teach poses such as Seated Forward Bend, King Pigeon, Boat, Side Plank and inversions. You can hold poses for seven breaths or longer during this segment. Make sure you use counter poses, if applicable.

Step 7

Restore your students with a remaining five to 15 minute segment of relaxation. You can teach guided meditation or visualizations for part of the time. End with complete release in Savasana, or Corpse pose. Leave a few minutes for silence.

Step 8

Take one or two minutes to talk your students out of relaxation and bring them into an easy seated position. Thank them for practicing yoga and encourage them to ask questions after class.